

Note: This guide was written for non-analog controllers. These tips are still relevant, but I just don't have as much experience with analog controllers.
When you collect classic games and hardware like I do, you certainly have yourself some classic controllers as well. At least I hope you do. Or did you buy that PlayStation just to stare at it? These controllers usually hold up pretty well, even over 30 years later, but sometimes they get a little grimy, and sometimes your button presses don't get picked up properly. Does this sound familiar? In that case, chances are, all you gotta do is...
I find that when hardware starts to mess up, a good chunk of the time, it's just dirty. Especially when you buy a used game pad, you really have no idea where it's been. Your controller may look fresh as a daisy, but even so, it could look like a crime scene inside. Of course, if it's nasty on the outside, it could be even worse under the hood. It's always a good idea to give everything a rigorous scrub. For best results, you'll need to...
Disassembly is usually as simple as taking out five or six philips head screws, then opening it up slowly so you don't drop and lose anything important. Make sure your screwdriver is the right size for the job, otherwise you run the risk of damaging the screw's head, making it a lot harder to remove and insert. My rule of thumb is to put your screwdriver in and, applying virtually no pressure, lightly try to twist it from side to side without actually unscrewing. If it doesn't move or slip, you have the right size. Now, it's time to...
You'll want to scrub pretty much every last thing besides the electronic bits (unless they look like they really need it—this won't hurt it as long as you let it dry). I like to use a toothbrush and dish soap under warm-to-hot water for the job. If you're doing this in the sink like I do, make sure you plug the drain, or else say bye-bye to your Y button. Often there'll be a buildup of gamer gunk in the crevasse (or whatever you'd call it) around the edges of the controller where the two halves of the shell connect. Definitely scrub all that off. If there's dirt stuck in the fine details on the controller, for example, the text on the back of the Nintendo and Super Nintendo controllers, just keep the soap, water and scrubbing coming and it should take care of it before too long. No need for anything more abrasive, which could damage the plastic. Absolutely do not use a magic eraser sponge unless absolutely necessary. For the uninitiated, those things are basically extra-fine squishy sandpaper. You'll be shaving your controller down if you use one of those. Scrub, scrub and scrub some more until all has been scrubbed. While you're scrubbing, be sure that you...
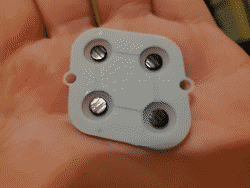
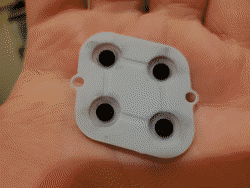
Buttons not always reliable? D-pad creaky and squeaky? Check out the little rubber sheets that are (or were, if you've already disassembled your controller) between the buttons and the PCB. These are called conducive pads, and technically speaking, they ARE the buttons. That being said, you'll want to make sure that these are properly cleaned for maximum pushitude. If you're following along, hopefully you'll have already given them a soapy scrub under warm water, which not only cleans them, but it hydrates the silicone as well. If your controller was suffering from squeaky D-pad syndrome, it shouldn't be anymore. Pat the pads dry with a rag or something, then flip them over so you can see the little black dots on the underside. Most likely if you're having unresponsive button troubles, these dots will be shiny and have the pattern of the board underneath imprinted into them.
This is no bueno, but very easy to rectify. Simply get yourself some isopropyl alcohol and a cotton swab or two. Dip a swab in the rubbing alcohol and scrub the black dots until they're matte black—no longer shiny. This will ensure your buttons will press properly every time. I recommend the warm water hydrating scrub before this, because if the rubber is dry, you risk ripping it, which is not something you want to do! In my experience, there's no fix for ripped conductive pads. If a tear forms in the little dome-shaped parts, it'll only get worse the more you use the controller, and eventually, that button will become irreversibly mushy. If you've ever used a controller which had a button or buttons which provided little to no push resistance, that's probably what happened.
Nice and shiny! Or, wait... Squeaky clean! Um... Never mind. Don't put up the cotton swabs just yet, though, because it's worth cleaning off the button contacts on the PCB as well.
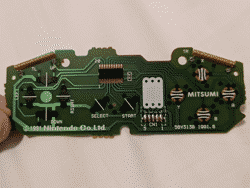
You can probably guess which parts I'm referring to right away. The (usually) black parts that the conductive pads press down on. These aren't usually as much of a problem as the conductive pads are, but go ahead and clean 'em while you're in there. Might as well, right? Once that's done and everything has been dried off, it's finally time to...
This is pretty self-explanatory, just reverse the disassembly, but there are still a few things to note. When reinstalling a screw, it's good practice to put the screw in place, then put just a bit of pressure on it and rotate it counter-clockwise until it makes a light pop—you'll probably feel it more than you'll hear it—then screw it in as usual, unless you feel some resistance, in which case, move the screw to a different hole and repeat. This is to avoid stripping the screw post, which means you'll have everything held together nice and snug, like it just came out of the factory. Keep this in mind when reassembling pretty much anything! Also, if you're having trouble putting it back together, there are sure to be teardown videos out there which you can reference. This will also help if you end up with a stray piece and you're not sure where it goes.
This is a technique I can't 100% stand by, but I've heard multiple people vouch for it. If your conductive pads feel a little soft or mushy; if there's barely any physical feedback on the buttons, you might want to try this trick as a last-ditch effort. First, inspect the pads to make sure there aren't any tears in the silicone. If there are, as I said earlier, I believe they are beyond saving. Bring a pot of water to a rolling boil, then toss your conductive pads in for one minute. Once time is up, fish 'em out and let 'em dry. Supposedly, this will bring the spring back to worn-down pads. Again, I can't confirm, and I confess that my attempts have yeilded no noticeable improvement, but if so many people stand by the technique, it can't be total mumbo-jumbo, can it...?
Regrettably, if you're not able to save the conductive pads, you may be out of luck. There are 3rd party replacements available online, but I'd advise against purchasing them. Maybe there are good ones out there, and please let me know if there are, but all the ones I've used are just as mushy brand new as a broken-down original from the 90s.
If your controller (or other hardware) is a dull yellow color and it's not supposed to be, you may want to try Retr0bright in order to restore its color. There are plenty of in-depth guides out there, but basically what you'll need is high-percentage hydrogen peroxide, in paste or liquid form, and UV light, either from LED strips or the sun. Coat/submerge the yellowed plastic in the hydrogen peroxide and set it under the UV light for a bit, and the yellowing should reverse. I've personally had mixed results with multiple methods, but it's worth a shot if you want your gear to look brand new. This works mostly for white or bright colored plastics, and even then, not all types of plastic. I've had luck with a Dreamcast and a Famicom, but it totally ruined my SNES mouse. Even the consoles it did work for went back to being yellow after a few months. Maybe there are ways to slow the re-yellowing, but I'm not sure. Basically, what I'm saying is, Retr0bright at your own risk.